我們今天要試著讓環狀LED燈發出紅藍綠(RGB)循環閃爍以及建立七彩旋轉光環(NeoPixel)。
需要的材料如下:
WS2812 RGB 12-LEDs 環狀燈條 x1
Pi Pico主板 x 1
排線數條
我們先看到下圖中,環狀燈條的背面,有三根接腳,D1是訊號線,可以接到Pico主板的第1腳(GP0),5V是電源線接到Pico的第40腳(VBUS),GND是地線接到第38腳(GND)。
接著開始用Thonny寫程式,所採用的程式參考來自以下網站:
https://electrocredible.com/neopixel-micropython-raspberry-pi-pico-ws2812b/
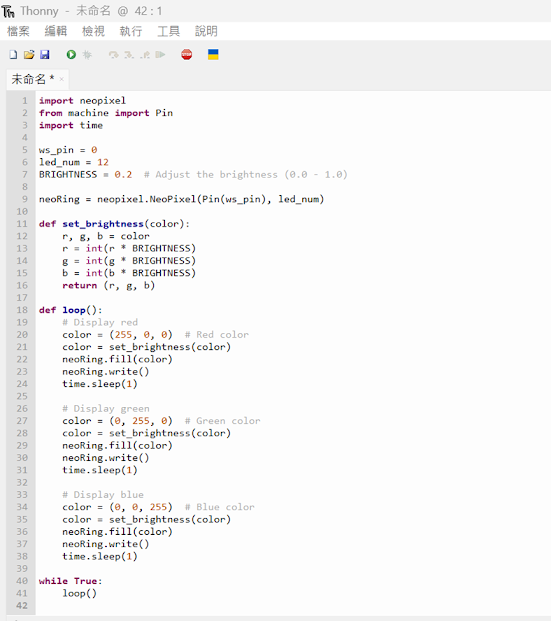
首先讓環狀LED燈發出紅藍綠(RGB)循環閃爍。
程式內容中將 ws_pin設定為 0,表示連接環狀LED燈的訊號線道 GP0 腳位。 led_num是WS2812環中LED的數量,我們設定為12,。
BRIGHTNESS的指令用來控制 NeoPixel 環的亮度,我們設定為 0.2,表示 LED的亮度等級為20%亮度,若要達到最大亮度,請將此變數設為 1。
loop 函數依序顯示三種顏色,首先將 color 設為 (255, 0, 0),代表紅色。然後呼叫set_brightness來調整顏色的亮度。neoRing.fill(color) 是用調整後的顏色填滿LED環。之後,它使用 neoRing.write() 以新顏色更新LED環。顯示綠色和藍色是重複相同的過程。最後建立無限循環,重複呼叫loop函數,不斷循環顯示顏色。
(255,0,0)是紅色顏色的描述,綠色是(0,255,0),RGB燈環理論上可以顯示千百種不同顏色的燈光,大家可以在網路上找相關資訊再嘗試。
執行程式後就可以看到LED燈環輪流發出紅綠藍三個顏色的燈光。
可以複製的程式
import neopixel
from machine import Pin
import time
ws_pin = 0
led_num = 12
BRIGHTNESS = 0.2 # Adjust the brightness (0.0 - 1.0)
neoRing = neopixel.NeoPixel(Pin(ws_pin),
led_num)
def set_brightness(color):
r, g, b = color
r
= int(r * BRIGHTNESS)
g
= int(g * BRIGHTNESS)
b
= int(b * BRIGHTNESS)
return (r, g, b)
def loop():
#
Display red
color = (255, 0, 0) # Red color
color = set_brightness(color)
neoRing.fill(color)
neoRing.write()
time.sleep(1)
#
Display green
color = (0, 255, 0) # Green color
color = set_brightness(color)
neoRing.fill(color)
neoRing.write()
time.sleep(1)
#
Display blue
color = (0, 0, 255) # Blue color
color = set_brightness(color)
neoRing.fill(color)
neoRing.write()
time.sleep(1)
while True:
loop()
可以複製的程式
import neopixel # Import the neopixel module for controlling the WS2812 LEDs
from machine import Pin # Import the Pin module for GPIO control
import time
# Import the time module for delays
ws_pin = 0
# GPIO pin connected to the data line of the WS2812 ring
led_num = 12 # Number of LEDs in the WS2812 ring
position = 0 # Variable to keep track of the current
position in the rainbow animation
brightness = 0.5 # Adjust the initial brightness (0.0 to 1.0)
neoRing = neopixel.NeoPixel(Pin(ws_pin),
led_num) # Create an instance of the
NeoPixel class to control the WS2812 ring
def wheel(pos):
#
Function to generate a color based on a position in the rainbow
if pos < 85:
return (pos * 3, 255 - pos * 3, 0)
# Generate a red-yellow color
elif pos < 170:
pos -= 85
return (255 - pos * 3, 0, pos * 3)
# Generate a yellow-green color
else:
pos -= 170
return (0, pos * 3, 255 - pos * 3)
# Generate a green-blue color
def loop():
global position, brightness # Use
global variables for position and brightness
for i in range(led_num):
# Iterate through each LED in the ring
hue = int(i * (255 / led_num) + position) % 256 # Calculate the hue value based on the LED
position and current position
color = wheel(hue) # Get the
color based on the calculated hue
color = tuple(int(val * brightness) for val in color) # Adjust the color brightness
neoRing[(i + position) % led_num] = color # Set the color of the corresponding LED
neoRing.write() # Update the
WS2812 ring with the new colors
position = (position + 1) % led_num
# Increment the position for the next iteration
time.sleep_ms(200) # Delay for a
short period to control the animation speed
while True:
loop() # Run the loop function
continuously to display the rainbow animation
.jpeg)


.jpeg)

留言
張貼留言